14 Steps How to Disconnect a Gas Dryer?
Safely disconnecting a gas dryer is a critical task that requires careful attention to detail and a commitment to safety. Whether you’re relocating your dryer, performing routine maintenance, cleaning vents, repairing a malfunctioning gas dryer or how does a gas dryer work, it’s essential to prioritize safety throughout the process. In this comprehensive guide, we will provide you with a detailed step-by-step process for how to disconnect a gas dryer, while highlighting the importance of adhering to safety protocols at each stage.
Key Takeaways
Before embarking on the disconnection of a gas dryer, remember the following key takeaways:
- Safety should always be your top priority.
- Gather the necessary tools and safety equipment before beginning.
- Follow the 14-step guide carefully, paying attention to safety precautions at every stage.
- Don’t hesitate to contact a professional if you encounter any issues or uncertainties during the process.
Why Disconnect a Gas Dryer?
Before we delve into the step-by-step guide, let’s explore various scenarios that may necessitate the disconnection of a gas dryer:
- Before Repairing a Broken Dryer: When your gas dryer malfunctions, the first crucial step is to disconnect it from the gas supply to ensure your safety during the repair process.
- Cleaning Dryer Vents: Regular maintenance and dryer vent cleaning are essential to prevent lint buildup, reduce fire hazards, and maintain the appliance’s efficiency. Disconnecting the gas dryer is often necessary for a thorough vent cleaning.
- Relocating the Dryer: If you’re moving your gas dryer to a new location, whether within your home or to a different residence, you’ll need to disconnect it from both the electrical and gas sources.
- Routine Maintenance: Periodic maintenance tasks, such as cleaning or replacing components, may require disconnection from the gas supply to ensure the job is done safely and effectively.
Essential Supplies
Before you commence the disconnection process, ensure you have the necessary tools and safety equipment at hand:
- Wrench: A wrench is indispensable for disconnecting the gas line.
- Screwdriver: You’ll need a screwdriver for removing fasteners or access panels on the appliance.
- Teflon Tape: Teflon tape plays a vital role in ensuring a secure connection when you eventually reconnect the gas line.
- Fire Extinguisher: Having a fire extinguisher readily accessible is a prudent safety precaution.
- Safety Goggles, Face Mask, and Gloves: Protecting your eyes, face, and hands from potential irritants and hazards is essential.
| Item | Purpose |
|---|---|
| Wrench | Disconnecting the gas line |
| Screwdriver | Removing fasteners and access panels |
| Teflon Tape | Ensuring a secure gas line connection |
| Fire Extinguisher | Safety precaution in case of fire |
| Safety Goggles, Face Mask, and Gloves | Protection for eyes, face, and hands |
14 Step-by-Step Guide how to disconnect a gas dryer?
Let’s delve into a comprehensive 14-step guide on how to disconnect a gas dryer:
- Remove Clothes and Lint: Begin by emptying the dryer and thoroughly cleaning any lint from the lint tray. This step reduces the risk of fire hazards.
- Turn Off the Dryer: Ensure that the gas dryer is turned off before proceeding.
- Extinguish Flames: Extinguish any open flames in your home, including pilot lights on other gas appliances.
- Ventilate the Area: Open windows and doors to enhance ventilation and disperse any lingering gas fumes.
- Have a Fire Extinguisher On Hand: Keep a fire extinguisher within easy reach as an additional precaution.
- Cover Your Face and Hands: Put on safety goggles, a face mask, and gloves to shield yourself from potential irritants and hazards.
- Unplug the Dryer: Safely disconnect the dryer from the electrical outlet to eliminate any risk of electric shock.
- Turn Off the Gas: Locate the gas valve, usually situated at the back of the dryer, and turn it off in a clockwise direction.
- Slide the Dryer Out: Carefully slide the gas dryer away from the wall, creating sufficient space to work comfortably.
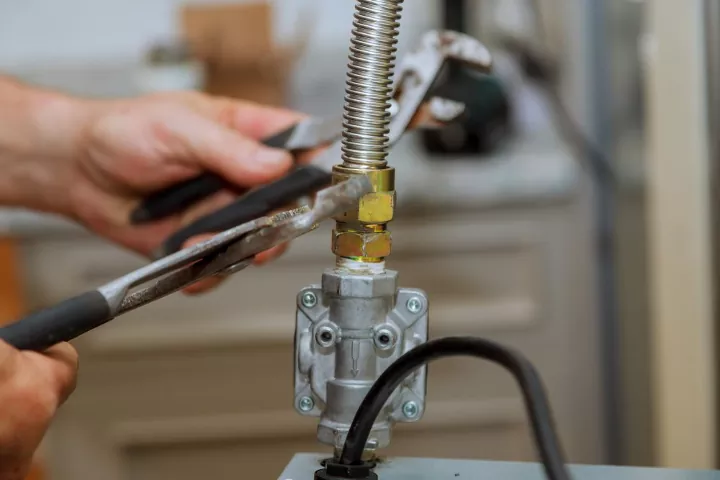
- Disconnect the Gas Line: Using your wrench, gently and carefully disconnect the gas line from the dryer. Be cautious not to damage the gas line or create any gas leaks.
- Cap the Gas Line: Seal the open end of the gas line with Teflon tape and a suitable cap to prevent any gas leakage.
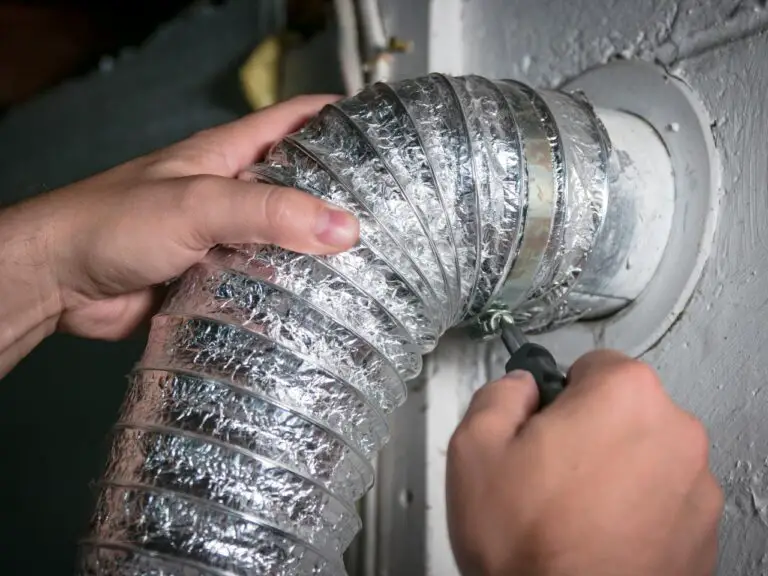
- Disconnect the Vent Duct: To complete the disconnection process, remove the vent duct from the dryer. This step is essential for both safety and cleaning purposes.
- Air Out the Room: Allow the area to ventilate for a few minutes. It’s important to ensure that any gas fumes have dissipated before proceeding further.
- Call a Professional if Needed: If, at any point, you detect a persistent smell of gas or if you are uncertain about the disconnection process, it’s imperative to call a professional gas technician to assess and address the issue.
Additional Tips and Warnings
To ensure your safety during the gas dryer disconnection process, consider the following additional tips and warnings:
- Gas dryers should always be disconnected with care to prevent gas leakage or other safety hazards.
- Using the appropriate tools and safety gear, such as safety goggles and gloves, is essential to minimize risks.
- Before reconnecting the dryer, carefully inspect for any gas odors or leaks. If you detect any, refrain from proceeding and seek professional assistance.
- Consult your dryer’s manual for specific instructions and any manufacturer-recommended safety precautions.

FAQ How to Disconnect a Gas Dryer
Does a gas dryer need a shut off valve?
Yes, a gas dryer should have a dedicated shut-off valve. This gas dryer shut off valve is essential for safety and maintenance purposes. It allows you to easily and quickly disconnect the gas supply to the dryer when needed, such as during routine maintenance, repairs, or when moving the appliance. Having a shut-off valve for the gas dryer ensures that you can isolate the gas supply without affecting other gas appliances in your home. It is a safety feature that should be present and operational for every gas dryer, and it’s important to know its location and how to use it in case of emergencies or routine maintenance.
How much does it cost to disconnect a gas dryer?
The cost of disconnecting a gas dryer can vary depending on several factors. If you choose to do it yourself, the cost may be minimal, mainly comprising the expense of any supplies like wrenches, Teflon tape, or caps, which are relatively affordable and typically amount to around $20 to $30. However, if you prefer to hire a professional gas technician, the cost will be higher and typically includes their service fees. The exact cost for professional services can vary significantly based on your location, the complexity of the disconnection, and whether any additional repairs or services are required. To get an accurate cost estimate, it’s advisable to consult with a local gas appliance service provider.
Is it hard to disconnect a dryer?
Disconnecting a gas dryer can be a moderately challenging task, primarily due to safety concerns. It involves several steps, including turning off the gas supply, detaching the gas line, and ensuring there are no gas leaks. If you’re comfortable using basic tools and following safety precautions, you can manage the disconnection process. However, it’s crucial to follow the steps carefully and precisely to avoid any safety hazards. If you are uncertain or uncomfortable with any aspect of the disconnection, it’s recommended to seek professional help to ensure safety and compliance with local regulations.
How to Unhook a Gas Dryer
Unhooking a gas dryer is a critical task that requires careful attention to detail to ensure both safety and functionality. Whether you’re relocating your dryer, performing routine maintenance, or making repairs, it’s essential to prioritize safety and adhere to specific guidelines for a smooth unhooking process.
How do you move a gas dryer?
Moving a gas dryer involves several steps beyond just disconnecting it. Here’s a general guideline for moving a gas dryer:
- Disconnect the Dryer: Follow the disconnection steps mentioned in this guide to safely disconnect the gas dryer from both the gas and electrical sources.
- Prepare the Dryer: Empty the dryer of all clothes and clean out any lint from the lint tray.
- Lift with Care: Gas dryers can be heavy, so it’s essential to have assistance when lifting it. Enlist the help of another person or use a dolly or moving equipment if necessary.
- Secure the Gas Line: If you plan to reuse the dryer at the new location, carefully cap the open end of the gas line using Teflon tape and a suitable cap.
- Reconnect at the New Location: Once you’ve safely moved the dryer to its new location, you’ll need to reconnect it to the gas and electrical sources, following the manufacturer’s instructions and safety guidelines.
Moving a gas dryer should always be done with caution and attention to safety. If you’re unsure about any aspect of the process, consider seeking professional assistance to ensure the safe relocation of the appliance.

Conclusion
How to disconnect a gas dryer? Throughout this guide, we have emphasized the fundamental importance of safety when disconnecting a gas dryer. Whether you’re tackling routine maintenance, vent cleaning, or repairs, following the provided safety guidelines is non-negotiable. If you ever find yourself in doubt or facing an unusual situation, do not hesitate to seek professional help.